Manaslu Circuit Trek: The Ultimate Guide For 2026

Manaslu Circuit Trek: The Ultimate Guide For 2026
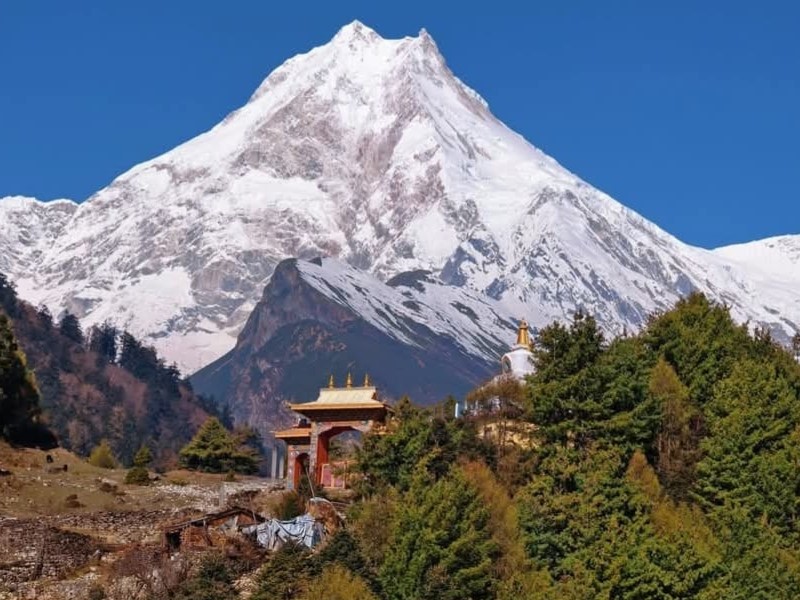
Manaslu Circuit Trek: The Ultimate Guide For 2026: The Manaslu Circuit Trek is one of the best treks, offering you a blend of cultural richness and an adventurous journey. Standing at Larkya La Pass, at 5,160 meters, might make you gasp from the thin air with the sheer magnificence of the panorama unfolding before you.
That moment when you reach Manaslu Base Camp can be surrounded by Himalayas like Manaslu, Himlung Himal, and Cheo Himal, which is exactly why the Manaslu Circuit has become a go-to recommendation for trekkers who’ve been there, for something more raw, more real.
What Makes the Manaslu Circuit Special?
Here’s the thing about trekking in Nepal: everyone has heard about the Annapurna Circuit Trek and the Everest Base Camp Trek, but Manaslu? It’s like that incredible restaurant locals keep to themselves. The government’s permit restrictions act as a natural filter, keeping crowds manageable and the experience genuinely authentic.
What really gets me about this trek is the dramatic transformation you witness. You’ll start in a humid, subtropical jungle where you’re swatting away insects, and within a week, you’re crunching through snow with prayer flags snapping in the high-altitude wind. The cultural shift is equally striking—Hindu villages give way to Tibetan Buddhist communities where monasteries cling to mountainsides and yak caravans still dominate the “traffic.”
How Long and How Far is The Manaslu Circuit Trek?
The Manaslu Circuit Trek covers roughly 177 kilometers, but those aren’t flat kilometers. Between 14 to 18 days is standard and my honest advice is to take the 16-day route if your schedule allows.
Those extra acclimatization days aren’t just about preventing headaches—they’re about actually enjoying the trek instead of suffering through it. Trust me, you’ll want time to explore Pungyen Gompa or take that side trip to Manaslu Base Camp when you’re at Samagaun.
When Should You Actually Go For The Manaslu Circuit Trek?
Based on what I’ve heard from countless trekkers, the two best Seasons for the Manaslu Circuit Trek are:
Spring (March to May) brings wildflowers, colourful landscapes and warmer temperatures.
Autumn (September to November) is the peak season for good reason. After the monsoon wraps up, the air is crisp, visibility is clear, and temperatures are comfortable.
How Hard Is The Manaslu Circuit Trek? The Unfiltered Truth
Honestly, Manaslu Circuit Trek is possible, but you have to earn the view. Passing Larkya La Pass at 5,160 meters can be challenging but possible with proper preparations. Proper acclimatization, which we’ve set in our itinerary and listening to your body becomes a MUST.
You’ll be walking six to eight hours most days, sometimes more. The terrain ranges from pleasant forest trails to steep, rocky scrambles and near the pass, depending on the season, you might be post-holing through snow or navigating ice patches.
To prepare yourself for the Manaslu Circuit Trek, spend 8-12 weeks before your trek doing long hikes with elevation gain. Throw a 7-8 kg backpack on and hit the trails every weekend. Stair climbing, running, cycling and anything that builds cardiovascular endurance and leg strength. Trust me, you’ll thank me later! Manaslu Circuit Trek: The Ultimate Guide For 2026
Day-by-Day Itinerary: What Actually Happens Out There
Let me walk you through what each day really feels like, not just elevations and distances, but the actual experience:
Day 1: Kathmandu to Soti Khola (710m / 2,329ft)
An around 7-8 hour jeep ride will test your patience. The road from Kathmandu to Soti Khola is… let’s call it “adventurous.” You’ll wind through terraced hills, cross rivers, and probably stop for dal bhat at a roadside shack. There would be nothing fancy, but the sound of the rushing river might put you asleep.
Day 2: Trek to Machha Khola (930m / 3,051ft)
Your first real trekking day eases you gently. It’s about 6-7 hours of walking through subtropical forest, crossing suspension bridges that sway more than you’d like. The path follows the river closely. The village straddles both sides of the river, and teahouses are basic but welcoming.
Day 3: Trek to Jagat (1,410m / 4,626ft)
Things get more interesting as you’ll cross the river multiple times on suspension bridges, climb through dense forest where waterfalls crash down beside the trail, and pass through tiny settlements. The climb to Jagat is steady, and your legs will feel it. Jagat sits at a checkpoint where you’ll register your permits.
Day 4: Trek to Deng (1,860m / 6,102ft)
On Day 4, the valley starts narrowing and the landscape shifts noticeably. You’ll trek through forests of rhododendron and bamboo, cross more bridges, and navigate some rocky sections. The trail passes through Philim, a substantial Gurung village where you might spot your first prayer wheels. By the time you reach Deng, the air’s cooler, the peaks feel closer, and cell phone reception becomes a distant memory.
Day 5: Trek to Namrung (2,630m / 8,628ft)
As you climb toward Namrung, Hindu villages give way to Tibetan Buddhist communities. And there are mani walls everywhere (stone walls carved with Buddhist mantras—remember to keep them on your right), prayer flags, and chortens (Buddhist shrines) marking the trail. On clear mornings, you’ll see Manaslu and the surrounding peaks from here, and it’s breathtaking.
Day 6: Trek to Lho (3,180m / 10,433ft)
It’s a shorter day distance-wise, but still 5-6 hours of trekking. You’re gaining altitude more noticeably now. The trail climbs through Lihi and Sho before reaching Lho, a beautiful village with whitewashed houses and an active monastery. The local monastery is worth visiting if you’re there during prayer time.
Day 7: Trek to Samagaun (3,530m / 11,581ft)
Another relatively short trekking day to a larger village, Samagaun. It has multiple teahouses, a monastery, and even a small school. The village spreads across a flat valley floor with incredible mountain amphitheater views. The gompa (monastery) here is active and beautiful.
Day 8: Acclimatization in Samagaun
On this day, most people either trek up to Pungyen Gompa (about 4,000m / 13,123ft) or make the longer hike toward Manaslu Base Camp. I suggest you prefer the base camp option if the weather permits. It’s a solid 6-7 hour round trip, but you’ll get close-up views of the north face.
Day 9: Trek to Samdo (3,860m / 12,664ft)
A gentle climb to Samdo, traditionally a Tibetan refugee settlement near the Tibetan border. The landscape has less vegetation, more rock and wind. It’s about 4-5 hours of trekking through an increasingly lunar landscape. Samdo itself is stark and beautiful, with stone houses huddled against the wind.
Day 10: Trek to Dharamsala / Larkya Phedi (4,460m / 14,632ft)
On the tenth day, you’re climbing to Dharamsala (also called Larkya Phedi). It’s only 3-4 hours of trekking, but you’ll feel every meter of altitude gain. Dharamsala is basic: stone buildings with dormitory-style rooms, minimal amenities. Most people can’t sleep well here due to altitude and anticipation and that’s normal.
Day 11: Cross Larkya La Pass (5,160m / 16,929ft) to Bimthang (3,720m / 12,205ft)
On the eleventh day, waking up is typically at 3:00-4:00 AM, as you’ll start in darkness with headlamps illuminating the trail as you begin the long climb. The final push to the pass takes about 4-5 hours from Dharamsala. Standing at Larkya La Pass, you’re surrounded by 8,000 and 7,000-meter peaks like Himlung Himal, Cheo Himal, Kang Guru, and of course, Manaslu.
Then comes the descent, 4-5 hours down to Bimthang, dropping over 1,400 meters (4,593ft). The landscape gradually softens as you descend and you’ll observe more greenery, less rock,and warmer air. By the time you reach Bimthang. Make sure you pack extra snacks, water, and warm layers for this day.
Day 12: Trek to Tilije (2,300m / 7,546ft)
You’ll trek for 6-7 hours. You’re descending rapidly through changing ecosystems and the trail passes through Karche, Gho, and several other small settlements before reaching Tilije. Tilije marks where the Manaslu Circuit joins the Annapurna Circuit trail and you might see trekkers coming from the opposite direction.
Day 13: Trek to Dharapani, then drive to Besisahar
The final trekking day takes you down to Dharapani, and at Dharapani, you’ll have a ride to Besisahar.
Day 14: Drive Back to Kathmandu
The drive back is typically 7-8 hours, longer if traffic’s bad. You’ll have time to process everything that happened, scroll through hundreds of photos, and probably doze off against the window. Arriving back in Kathmandu’s chaos after two weeks in the mountains is always surreal.
Manaslu Circuit Trek: The Ultimate Guide For 2026
Permits and Costs
Alright, here’s where things might get administratively annoying. The Manaslu region doesn’t allow independent trekking. You need a registered guide and a licensed agency like Well Plan Trekking to obtain permits.
You’ll need three permits:
The Manaslu Restricted Area Permit: costs USD 100 for the first week, then USD 15 per additional day.
Manaslu Conservation Area Permit: costs roughly USD 30.
Annapurna Conservation Area Permit: Costs USD 30, which is required while exiting via the Annapurna region.
We’ll handle this paperwork for you. All-in, expect trek costs starting from USD 900 – 1,800+, depending on group size, trek length, and how fancy you want your teahouses.
Additional Costs
Additional Costs include:
- Personal Expenses
- Travel Insurances
- Tips for guide and Porters
- Hot showers, WI-FI facilities,and charging facilities in Tea Houses usually cost USD 3–5 (Bring a power bank)
Manaslu Circuit Trek: The Ultimate Guide For 2026
What Teahouse Living Actually Looks Like
Manaslu teahouses range from “pleasantly rustic” to “genuinely basic.” You’ll get a private room, usually on a sharing basis with twin beds, thin mattresses, a pillow, and some blankets. Make sure to bring your own sleeping bag rated to at least -10°C because those blankets at altitude don’t cut it.
Bathrooms are shared, often with squat toilets (bring your own paper), and hot showers cost extra. At higher elevations, washing beyond face and hands becomes optional.
Food-wise, dal bhat becomes your best friend with its unlimited refills, hot, what the porters eat and it genuinely fuels you. Up high, menu variety shrinks so it’s important to lower your expectations and appreciate the effort.
Pack Smart: What You Really Need
I’ve seen people bringing ridiculous things (hair straighteners, seriously?) and others who underpacked dangerously. Here’s a comprehensive list of what actually matters:
Layering is everything. Start with good moisture-wicking base layers (wool or synthetic), not cotton. Mid-layers should insulate (fleece or lightweight down), and your outer shell needs to block wind and water. Bring a puffy down jacket for evenings and high altitude; you’ll basically live in it above 4,000 meters.
Footwear makes or breaks your trek. Waterproof boots that you’ve already broken in during training—not new ones. Bring camp shoes because you’ll desperately want to free your feet each evening. Gaiters help around the pass when there’s snow.
Sleeping bag: Don’t cheap out. Get something rated to -10°C or colder. You can rent in Kathmandu, but quality varies wildly.
Trekking poles: It’s non-negotiable.
The small stuff that matters: A headlamp with backup batteries, water purification, serious sunscreen (SPF 50+), UV-blocking sunglasses, basic first aid, and definitely altitude sickness medication (Diamox, prescribed by your doctor beforehand).
The Safety Talk Everyone Needs Before Going
Here’s what nobody tells you: altitude sickness doesn’t discriminate. I’ve watched ultra-marathoners crumble while their less-fit partners thrived. Genetics plays a role that we don’t fully understand.
Symptoms start subtly with mild headache, slight nausea, and fatigue beyond normal tiredness. Ignore these at your peril.
The golden rules: ascend slowly, drink absurd amounts of water (your pee should be clear), skip the alcohol, and never push through serious symptoms.
Diamox helps many people acclimatize, but discuss it with your doctor first. Some folks get weird tingling fingers or everything tastes carbonated—minor compared to severe altitude sickness.
Get proper insurance. travel insurance with coverage specifically including high-altitude helicopter evacuation up to 6,000 meters. People get airlifted from Manaslu regularly. Therefore, Travel Insurance is a MUST.
Environmental Responsibility
The mountains don’t need our trash so it’s important to pack out everything non-biodegradable. Carry a small bag for wrappers, water bottles and purification tablets eliminate plastic bottle waste. Some teahouses now charge extra for boiled water rather than selling bottles, which is progress.
So… Should You Do This Trek?
If you’ve read this far, probably yes. The Manaslu Circuit trek isn’t beginner-friendly, but it’s absolutely achievable for anyone willing to prepare properly and respect the challenge.
You’ll struggle some days. But you’ll also experience moments of profound beauty that no photograph captures,the silence at dawn, the kindness of strangers, the satisfaction of accomplishing something genuinely difficult.
Feel free to reach out to us if you’re ready to start planning. We’d love to help make this incredible journey happen for you.